This ‘Solar Solutions’ column has just passed an auspicious milestone – 100 articles and counting. In these past columns, I have presented a wide spectrum related to the design and installation of integrated solar hydronic systems in buildings (a.k.a. solar combisystems). Each article represents a small piece of a larger puzzle that provides a roadmap for hydronic solar heating system deployment on a larger scale.
These strategies don’t only apply to solar heating applications but have been installed in all kinds of hydronic heating applications where multiple sources of heat are connected to multiple heating loads. In fact, the term “solar heating” in this column can be substituted for nearly any combination of renewable heat or high efficiency hydronic alternative technologies. In past columns, I have mentioned existing installations that include wood boilers, waste heat recovery and ground-source heat pumps, for example.
Just in case you missed some of the earlier articles, I would like to take this occasion to review some key strategies covered in the last nine years, starting with a concept I have come to think of as the ‘Prime Directive’ (with apologies to Star Trek).
The Prime Directive: “It must be an upgrade.”
We cannot expect solar and renewables to be widely accepted in the larger consumer market, unless they are at least as reliable and trouble-free as conventional hot-water boiler systems. And, they will not become a sought-after and desirable upgrade by homeowners and building managers unless they demonstrate consistent reliable performance and longevity better than conventional, with the fingertip control that we have come to expect in hybrid cars and photo voltaic (PV) solar electric systems.
This defines the Prime Directive, which states: “Always design and install solar heating equipment that is at least as reliable and trouble-free as the conventional system it replaces. Whenever possible, provide high performance, longevity and control that surpasses the conventional alternatives.”
So, for example, as our world increasingly embraces automatic operation, intelligent computer control and internet connectivity, our “new standard” solar heating installations no longer require manual intervention to perform the complex sequence of operations from month to month and season to season. The solar/hydronic systems we are installing today are designed to be “fail safe,” and take care of themselves without requiring any special skill or knowledge from the occupants. Today, we have the technology and the field experience to make solar heating as good as, or better than, conventional heating technology. To ensure that solar heating will always be seen as an advance in technology and an upgrade to the building, follow the Prime Directive. Use these seven principles of good solar hydronic design as your guide:
The success of any solar hydronic home heating installation depends on the often-conflicting balance between any of these principles. Finding the balance between them defines the art of solar heating design and is the underlying theme of this column.
Top design and installation strategies
In the past 100 articles, I have presented a lot of detailed recommendations for solar combisystems and related designs. Many of my recommendations are in direct response to the incomplete or unreliable installation details found in earlier generations of solar heating installations. I have repaired, dismantled and remodeled many solar heating systems over the past 30 years. Here is a short list of good ideas that have appeared in these columns and have withstood the test of time. In recent years, they have proven their worth in hundreds of solar/hydronic installations, both retrofit and new. I now include virtually all of these strategies in every combisystem I design:
1. Documentation: Make a complete piping, wiring and control diagram.
Solar plumbing design and the controls are two sides of the same coin. The plumbing system will not work without compatible controls and vice versa. This does not happen by accident, and must be planned carefully before construction starts. The time spent documenting a complete piping and wiring plan is rewarded many times over in the time saved during installation, startup and normal maintenance. It is also invaluable to the future users and service people throughout the considerable decades in the life of such a system.
2. Primary loop configuration: Standardize the solar/hydronic piping.
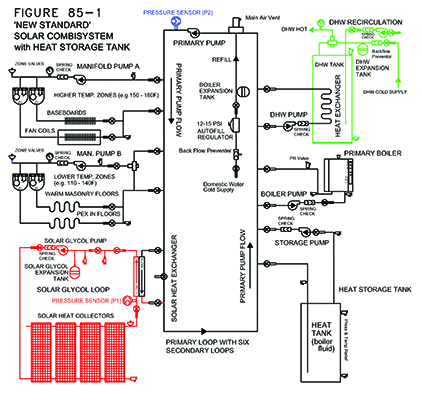
 A primary loop “flow center” piping configuration allows multiple heat sources to be connected to multiple heat loads and provide heat (1) directly, or to (2) bypass any source or any load, or (3) allow simultaneous operation of any source or load. In past articles, I use a simple primary loop combisystem called ‘Combi 101’ to illustrate these features on a system that includes a bank of solar heat panels, a boiler, a domestic hot water tank and warm floor space heating. Larger primary loop systems may also include swimming pools, baseboard zones, wood boilers and heat storage water tanks attached together on the same loop. (See Figure 85-1 for a sample schematic piping diagram.) Our company, AMENERGY-Solarlogic, has developed a software design tool for our own use that speeds the design process of the “new standard” primary loop system. We call it the “Slash-D,” and it is available (free) for anyone to use through our website.
3. Direct in-floor solar heat storage: Use concrete floors instead of water tanks.
By using two-stage room thermostats integrated into the solar control system, the considerable thermal storage capacity of concrete radiant heated floors can be used directly as solar heat storage. In many cases, this will downsize or even eliminate the need for large heat storage water tanks. (The “Slash-D” design software will help make that determination.) The same principal has been used successfully to heat swimming pools and hot tubs when radiant heat tubing is embedded in the concrete shell of a pool or spa.
4. Controlled overheat dissipation: Use controls to prevent collector overheat.
Solar heat collectors can cause a lot of trouble if the liquid inside them is allowed to overheat. We now employ control systems that can dissipate extra heat safely into a pool, water tank, existing garage floor, ice melt sidewalk or other normal masonry heating zone to cool the collectors in a controlled way. When controlled properly, human comfort is not compromised and steam is prevented in the collectors, using already existing in-floor or in-ground zone loops. This can eliminate the need for more complex cooling system add-ons.
5. Passive self-cooling: Some self-cooling methods work during a power failure.
Thermosyphon self-cooling fins can be added to any bank of flat plate solar heat collectors, as long as the piping inside and outside the collectors meets some simple prerequisites. Most of our recent solar combisystem installations include this cooling option to reduce the need for service over the long term. Drain-back solar heating systems will also survive power failures indefinitely, because they empty themselves when the solar pump loses power.
6. Night sky radiant cooling: Flat plate panels can be used at night for cooling.
NSRC cooling can be accomplished using glazed flat-plate solar heat’ panels or work even better using unglazed flat panels (often used to heat swimming pools). In most recent installations, we have included control settings that allow the warm floors to be cooled at night in summer by running the solar collectors backwards at night. Similar control systems can be programmed to dissipate heat at night from overheating water tanks when the stored heat is not being consumed.
7. Performance verification: Data-loggers, remote display and remote control.
One of the chronic problems that has plagued the solar heating professional in the past is the difficulty in verifying that a complex solar control system is working properly from season to season. Old-school controls required a site visit, where hours are spent in the mechanical room meditating over a slew of manual control settings. Hours can be spent on site trying to observe proper system response, which varies with the weather conditions. Some installers have added data-loggers to record temperatures and system status, so that a long-term record of performance can be used to make better informed adjustments. Some conventional solar controls now come with a data card built in that can be removed and downloaded to your computer. These kinds of data-loggers still require a trip to the site to gather the data. Internet enabled controls are now becoming more widely available where data can be accessed remotely without making a site visit.
Here at AMENERGY-SolarLogic, we have solved this problem by developing the SolarLogic Integrated Control (SLIC) system. This is an integrated control for “new standard” solar hydronic systems that includes data logging that can be downloaded over the internet. The SLIC also provides remote monitoring and remote adjustment and control over the internet. And as an added bonus, it provides all the control functions and capabilities mentioned in two through seven above in a single control box.
Final notes
These articles are targeted toward residential and small commercial buildings — smaller than 10,000 square feet. The focus is on pressurized glycol/hydronic systems since these systems can be applied in a wide variety of building geometries and orientations with few limitations. Brand names, organizations, suppliers and manufacturers are mentioned in these articles only to provide examples for illustration and discussion and do not constitute any recommendation or endorsement. Back issues of this column can be found in the archives at the PHCPpros.com and SolarLogic LLC websites.
The Seven Principles
The key ingredients for successful solar/hydronic design and installation can be described with seven objectives, listed below, roughly in order of their importance.
1. RELIABLE – Make it reliable. There is NO “solar payback” and no benefit when it stops working.
2. EFFECTIVE – Think user satisfaction. The user expects consistent, controllable and comfortable results from their space heating and DHW heating, with or without solar.
3. COMPATIBLE – Make it compatible in every possible way. Avoid components, fluids, temperatures or pressures that are not compatible with the existing systems, the architecture, materials, human skill levels or any other constraints at each job site.
4. ELEGANT – Use less to do more. Fewer parts mean lower cost and fewer things to go wrong.
Think of ways to use a single component to do two or three different functions.
5. SERVICEABLE – Make it easier to install, repair and adjust. Isolation valves, balance valves, air bleeders and unions can save a lot of grief. Data logging and remote control are often worth the savings in service trips.
6. EFFICIENT – Build In thermal and electrical efficiency. The solar equipment, electrical components and controls must all work together to provide high energy performance and consistent comfort levels.
7. VERIFIABLE – Monitoring, metering, data-logging and remote control. Performance must be demonstrable, proven by data records that are easily accessible and easily displayed on demand.


