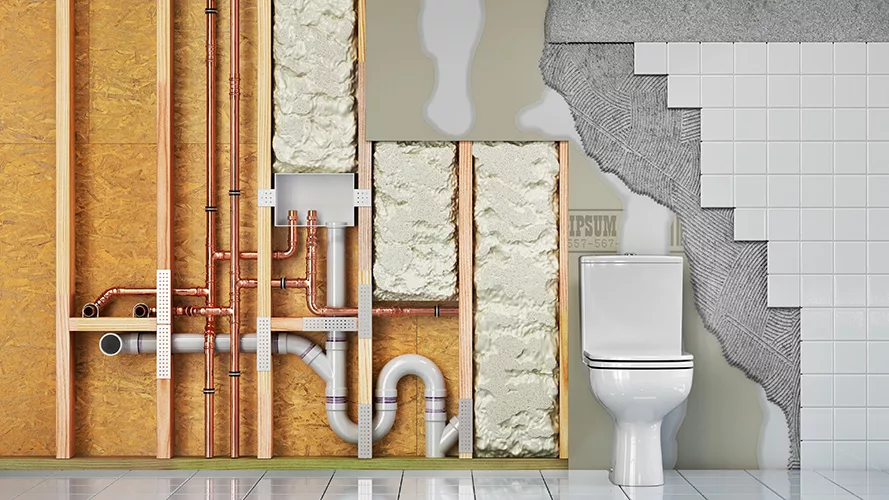
Multifamily construction is driven by efficiency. Space optimization, maximizing usable floor area, construction speed, materials, and planning and zoning codes — all play a role in refining a solution. Concurrently with this effort, plumbing engineers streamline systems and distribution, and coordinate equipment and riser locations with the architect. One aspect of this that is often overlooked is the depth and size of the plumbing walls.
The sizing of plumbing walls or chases depends on multiple factors beyond simply the quantity and size of pipe. What are the piping materials and associated wall thickness? Is insulation required, and how thick? Are firewalls present? If so, what fire-stopping methods will be used? Some piping materials allow for tight changes in direction, while others require more width to make turns. These all factor into the sizing of plumbing walls.
To step through the process for determining the size of a plumbing wall, we introduce a hypothetical building to illustrate scenarios, providing tangible, repeatable examples that can be adapted to a local jurisdiction’s building codes. In this scenario, the building is a new construction building with 21 stories and 20 residential floors, with each residential floor having a floor-to-floor height of 9 feet 8 inches1.
The plumbing distribution consists of local water risers and sanitary stacks that serve clusters of plumbing fixtures, stacked across all 20 floors (dwelling units assumed to be identical). Each dwelling unit includes a laundry, a kitchen with a dishwasher, sink and refrigerator ice maker, and a bathroom group with a lavatory, water closet and combination tub/shower. Tenants will not have individual water submeters. This hypothetical multifamily residential building will be designed in accordance with the International Plumbing Code (IPC) 2024.
 |
 |
Sanitary stack sizing and the impact of fixture units
When designing sanitary stacks in multifamily buildings, one of the first decisions is selecting the pipe material, typically polyvinyl chloride (PVC) or cast iron. PVC is less expensive and easier to install, but has poor acoustical performance and thermal expansion characteristics when compared to cast iron. Noise control also factors in with resident expectations. The local code, pipe material, effluent temperature and sanitary stack length all influence whether thermal expansion control is required.
From this scenario, there are three plumbing clusters to consider: the laundry, kitchen, and bathroom groups. The baseline assumption is that the sanitary risers extend up the full length to support all 20 floors. Note that local plumbing codes and total fixture counts may require deviations from this approach. We recommend coordinating with the local jurisdiction to ensure the systems approach remains in compliance with local codes and standards.
Based on IPC 2024, the proposed fixture unit values are as follows:

When combining 20 floors of fixtures at each cluster, there are 40 total drainage fixture units (DFUs) for the laundry stack, 80 DFUs for the kitchen stack and 100 DFUs for the bathroom stack. To increase plumbing system efficiency and allow plumbing risers to be shared, dwelling units are often arranged back-to-back. Referencing sanitary drainage stacks in the IPC 2024, we find that a 3-inch stack supports up to 72 DFUs while a 4-inch stack handles up to 500 DFUs.
A question that often arises is at what point is a 4-inch stack not enough? Assume for this example a 4-inch stack limited to 500 DFUs per the IPC 2024, the largest DFU contributor being the bathroom group, and bathroom groups are arranged back‑to‑back to maximize efficiency and share common risers. At 10 DFUs per floor (5 DFUs + 5 DFUs), a 4‑inch stack can serve up to 50 residential floors, assuming no additional fixtures in the future.
Once this building exceeds 51 residential floors of back‑to‑back bathroom groups, the IPC 2024 then requires the sanitary stack size to increase to 6 inches for the lower floors. Note this will be used as a comparison point when evaluating plumbing wall thickness requirements later.
Selecting domestic water riser materials
For domestic water risers, several piping materials can be considered, including copper, chlorinated polyvinyl chloride (CPVC), polypropylene random copolymer with temperature resistance (PP‑RCT), and crosslinked polyethylene (PEX).
Copper is a metal pipe with limited thermal expansion from residential temperature swings, allowing for thinner pipe walls. It has numerous joining methods that can be completed quickly, with a long history of reliable use in water supply systems. CPVC, on the other hand, is a plastic pipe with much more expansion than copper, has thicker walls with larger outside diameters and smaller interior diameters, and requires relatively long curing times for joints due to its solvent‑cement joints2.
PP‑RCT is also a plastic pipe but with a reinforced core, expanding more than copper but less than CPVC. PP-RCT pipe walls are also thicker than CPVC, resulting in smaller interior diameters. PP-RCT benefits from fusion welding, reducing the time before the system is re‑pressurized during repairs. PEX adds another option for plastic piping, being more flexible and easier to route through tight spaces. PP‑RCT is more rigid and typically more expensive than CPVC and PEX, but less expensive than copper.
CPVC and PP-RCT are relatively new to the U.S. market but offer an alternative for water distribution, providing benefits such as reduced reliance on a commodity in high demand while maintaining long-term durability.
Pressure zoning and vertical water distribution
Referencing Table 1 for the water supply fixture unit pipe sizes, cold and hot water lines can be sized based on IPC 2024 requirements. The number of floors per pressure zone varies based on the allowable pressure range, minimum fixture pressure, pressure-reducing valve (PRV) set maximum pressure, and other losses from pipe friction, fixture elevation and PRV drop-off. Assuming a minimum of 25 pounds per square inch (psi) water pressure at fixtures and a PRV-limited maximum of 75 psi, 50 psi is available for system losses.
If friction and PRV losses are kept to 10 psi, then up to 40 psi remains for fixture elevation, supporting up to 10 floors per zone, given a 9-foot, 8-inch floor height. Providing water to the 10th floor or beyond in the 21-floor example requires a booster pump. Fixture units per cluster (see Table 1) are converted to gallons/minute (gpm) flow with pipe sizing per IPC 2024 Appendix E3, using limits of 3.0 psi/100 feet pressure loss with velocities below 5 feet/second (fps) for hot water and 8 fps for cold water (1.5-inch to 2-inch copper water pipe).
With pipe sizes and materials selected, the next step is to determine the pipe insulation requirements. According to the International Energy Conservation Code (IECC 2024), the minimum insulation thickness for water piping is the same regardless of pipe type, even though plastic materials like CPVC and PP‑RCT have thicker walls and lower thermal conductivity than copper. Insulation must remain continuous to meet the IECC 2024.
Using the 2-inch and 1.5-inch pipe sizes previously determined, together with the IECC 2024, the cold water piping will need a minimum of 1 inch of insulation and hot water piping a minimum of 1.5 inches of insulation wrapped all around. The outside diameters of the water pipe with insulation then increase to around a 5-inch diameter, worst case.
Fire-rated assemblies and UL-listed firestopping
With pipe assembly sizes defined, plumbing engineers consider how these systems and distribution penetrate through the building wall and floor assemblies. Some penetrations will require more safety protections than others, with assemblies having fire ratings being the most stringent.
In this example, the floors are concrete with 2-hour fire ratings, and select interior walls also have 2-hour fire ratings. Per code, pipe penetrations through fire-rated assemblies must carry an Underwriters Laboratories (UL) listed firestop system.
Firestopping plays a larger role in plumbing wall sizing than many realize. While multiple types exist, this project considers the two leading UL-listed through-penetration firestop systems: cast‑in-place devices and a built-up system complete with a firestop collar, wrap strip, mineral wool and firestop sealant. Cast‑in-place devices are commonly used in new construction for slab-to-slab penetrations where sleeves are planned, eliminating the need for built-up firestopping. This reduces the risk of incorrect core drilling as systems can be coordinated, providing a pre‑tested, complete system with a predictable performance.
In contrast, the built-up UL-listed through-penetration systems require X-raying, coring, a wrap strip, a collar, mineral wool, clamps and firestop sealant. The built-up systems are useful in retrofit projects where the concrete slab exists, or with project changes post-construction where pipe penetrations were not originally planned.
The advantages of using a cast-in-place, UL-listed solution include repeatability and planning that support quicker installations and reduced material and labor costs. These time and cost advantages compound in high-volume penetration projects, such as multifamily residential.
When considering how firestopping affects wall cavity space requirements, cast-in-place devices are predictable and measurable, streamlining planning during design and execution in construction. The built-up systems have flexibility to be installed within a smaller wall cavity, but the industry trends are that the minimal small space savings do not justify the risk to the project schedule, with budget top of mind. In this case, cast-in-place assemblies will be referenced when helping to define the size of the plumbing walls.
Translating pipe sizes into minimum wall stud sizes
With sanitary waste and water system pipe sizes determined, the next step identifies the largest pipe at each fixture cluster to inform the minimum plumbing wall size. As sanitary vents are never larger than the largest sanitary waste pipe, they do not factor into the determination of the plumbing wall depth. Depending on the water system’s distribution, some locations may have water supplied from above, with flow decreasing at lower floors. As the unit sizes in this example are identical, the overall plumbing wall size is determined by the maximum number of services and relative pipe sizes per floor.
Cast-in-place devices are built to specification and can be used for design. Some devices can be used for both plastic and metal piping, but it is important to confirm compatibility for the pipe material selected. Of the products reviewed from different manufacturers, the devices are similar enough to make the following generalizations:
• A cast-in-place device for a 3-inch pipe requires a floor opening of approximately 4.5-inches. This device has an interior opening of between 3.5 inches and 4 inches, with an associated bottom faceplate size between the 4.5-inch core and 6 inches.
• A cast-in-place device for a 4-inch pipe requires a floor opening of approximately 5.5 inches. This device has an interior opening of between 4.5 inches and 5 inches, with an associated bottom faceplate size between the 5.5-inch core and 8 inches.
• A cast-in-place device for a 6-inch pipe requires a floor opening of approximately 7.5 inches. This device has an interior opening of between 6 inches and 6.75 inches, with an associated bottom faceplate size between the 7.5-inch core and 10 inches.
The following tables highlight the differences in outside pipe diameters for nominal pipe sizes and different materials. Pipe materials will inform the associated cast-in-place device sizes. For example:

 It is important to remember that cast-in-place, UL-listed firestopping devices have bottom base plates. Plumbing wall spacing and locations must be wide enough to accommodate the entire UL-listed firestop assembly and base plate.
For the hypothetical 21-story multifamily building, Table 4 gives recommended minimum wall stud sizes for the plumbing fixture clusters and identifies the defining system type and pipe size. While local codes and project-specific requirements may vary, this highlights the process and steps required to support the successful integration of plumbing risers within plumbing walls.

References:
Horizontal distribution floors are expected to have a greater floor-to-floor height for water and HVAC.
Curing time is a consideration in the event that repair is needed during the life of the building.
Water flows could be calculated with the use of a Modified Hunter’s Curve or with IAPMO’s Water Demand Calculator. Verify accuracy and its use with local code prior to use.
Christopher Winnie, PE, CPD, is a plumbing engineer for SmithGroup in Chicago. He is the vice president – technical for the American Society of Plumbing Engineers (ASPE) Chicago and an adjunct faculty member at Illinois Institute of Technology. Leah Bosma is a plumbing engineer for SmithGroup in Detroit. She is a member of the ASPE Eastern Michigan Chapter, where she serves as the young professionals liaison.